DIY: Create coaster-to-coaster approval of your would-be slide show

DSC_8225

I take a lot of pictures, especially when I travel, but aside from a few large prints displayed around my house most of the files wind up just hogging space on my hard drive.

Since it’s next to impossible to convince friends or family to sit through a slideshow of the 4,357 photos I’ve collected in recent years from adventures in England, Germany and Peru, I knew I had to come up with something a little more functional.

That’s when I hit upon the idea of turning my travel gems into photo coasters.

Not only do they add a personal touch to serving drinks, but custom coasters allow me to show off some of my favourite moments from around the globe without bombarding guests with a never-ending slideshow.

My finished pieces are now permanently displayed on my coffee table. (I won’t admit to whether or not it has something to do with the paint chips they are strategically covering up.)

These coasters can also be turned into a homemade gift idea, personalized by using the recipient’s own wedding or baby photos.

DSC_8027

What you need:

4–12 tiles (4×4, 5×5 or 6×6 inches)
4–12 photo prints (4×4, 5×5 or 6×6 inches)
1 glue stick
1 can of a high-gloss finishing spray, like Zinsser Bulls Eye Soft-Gloss Spray Shellac

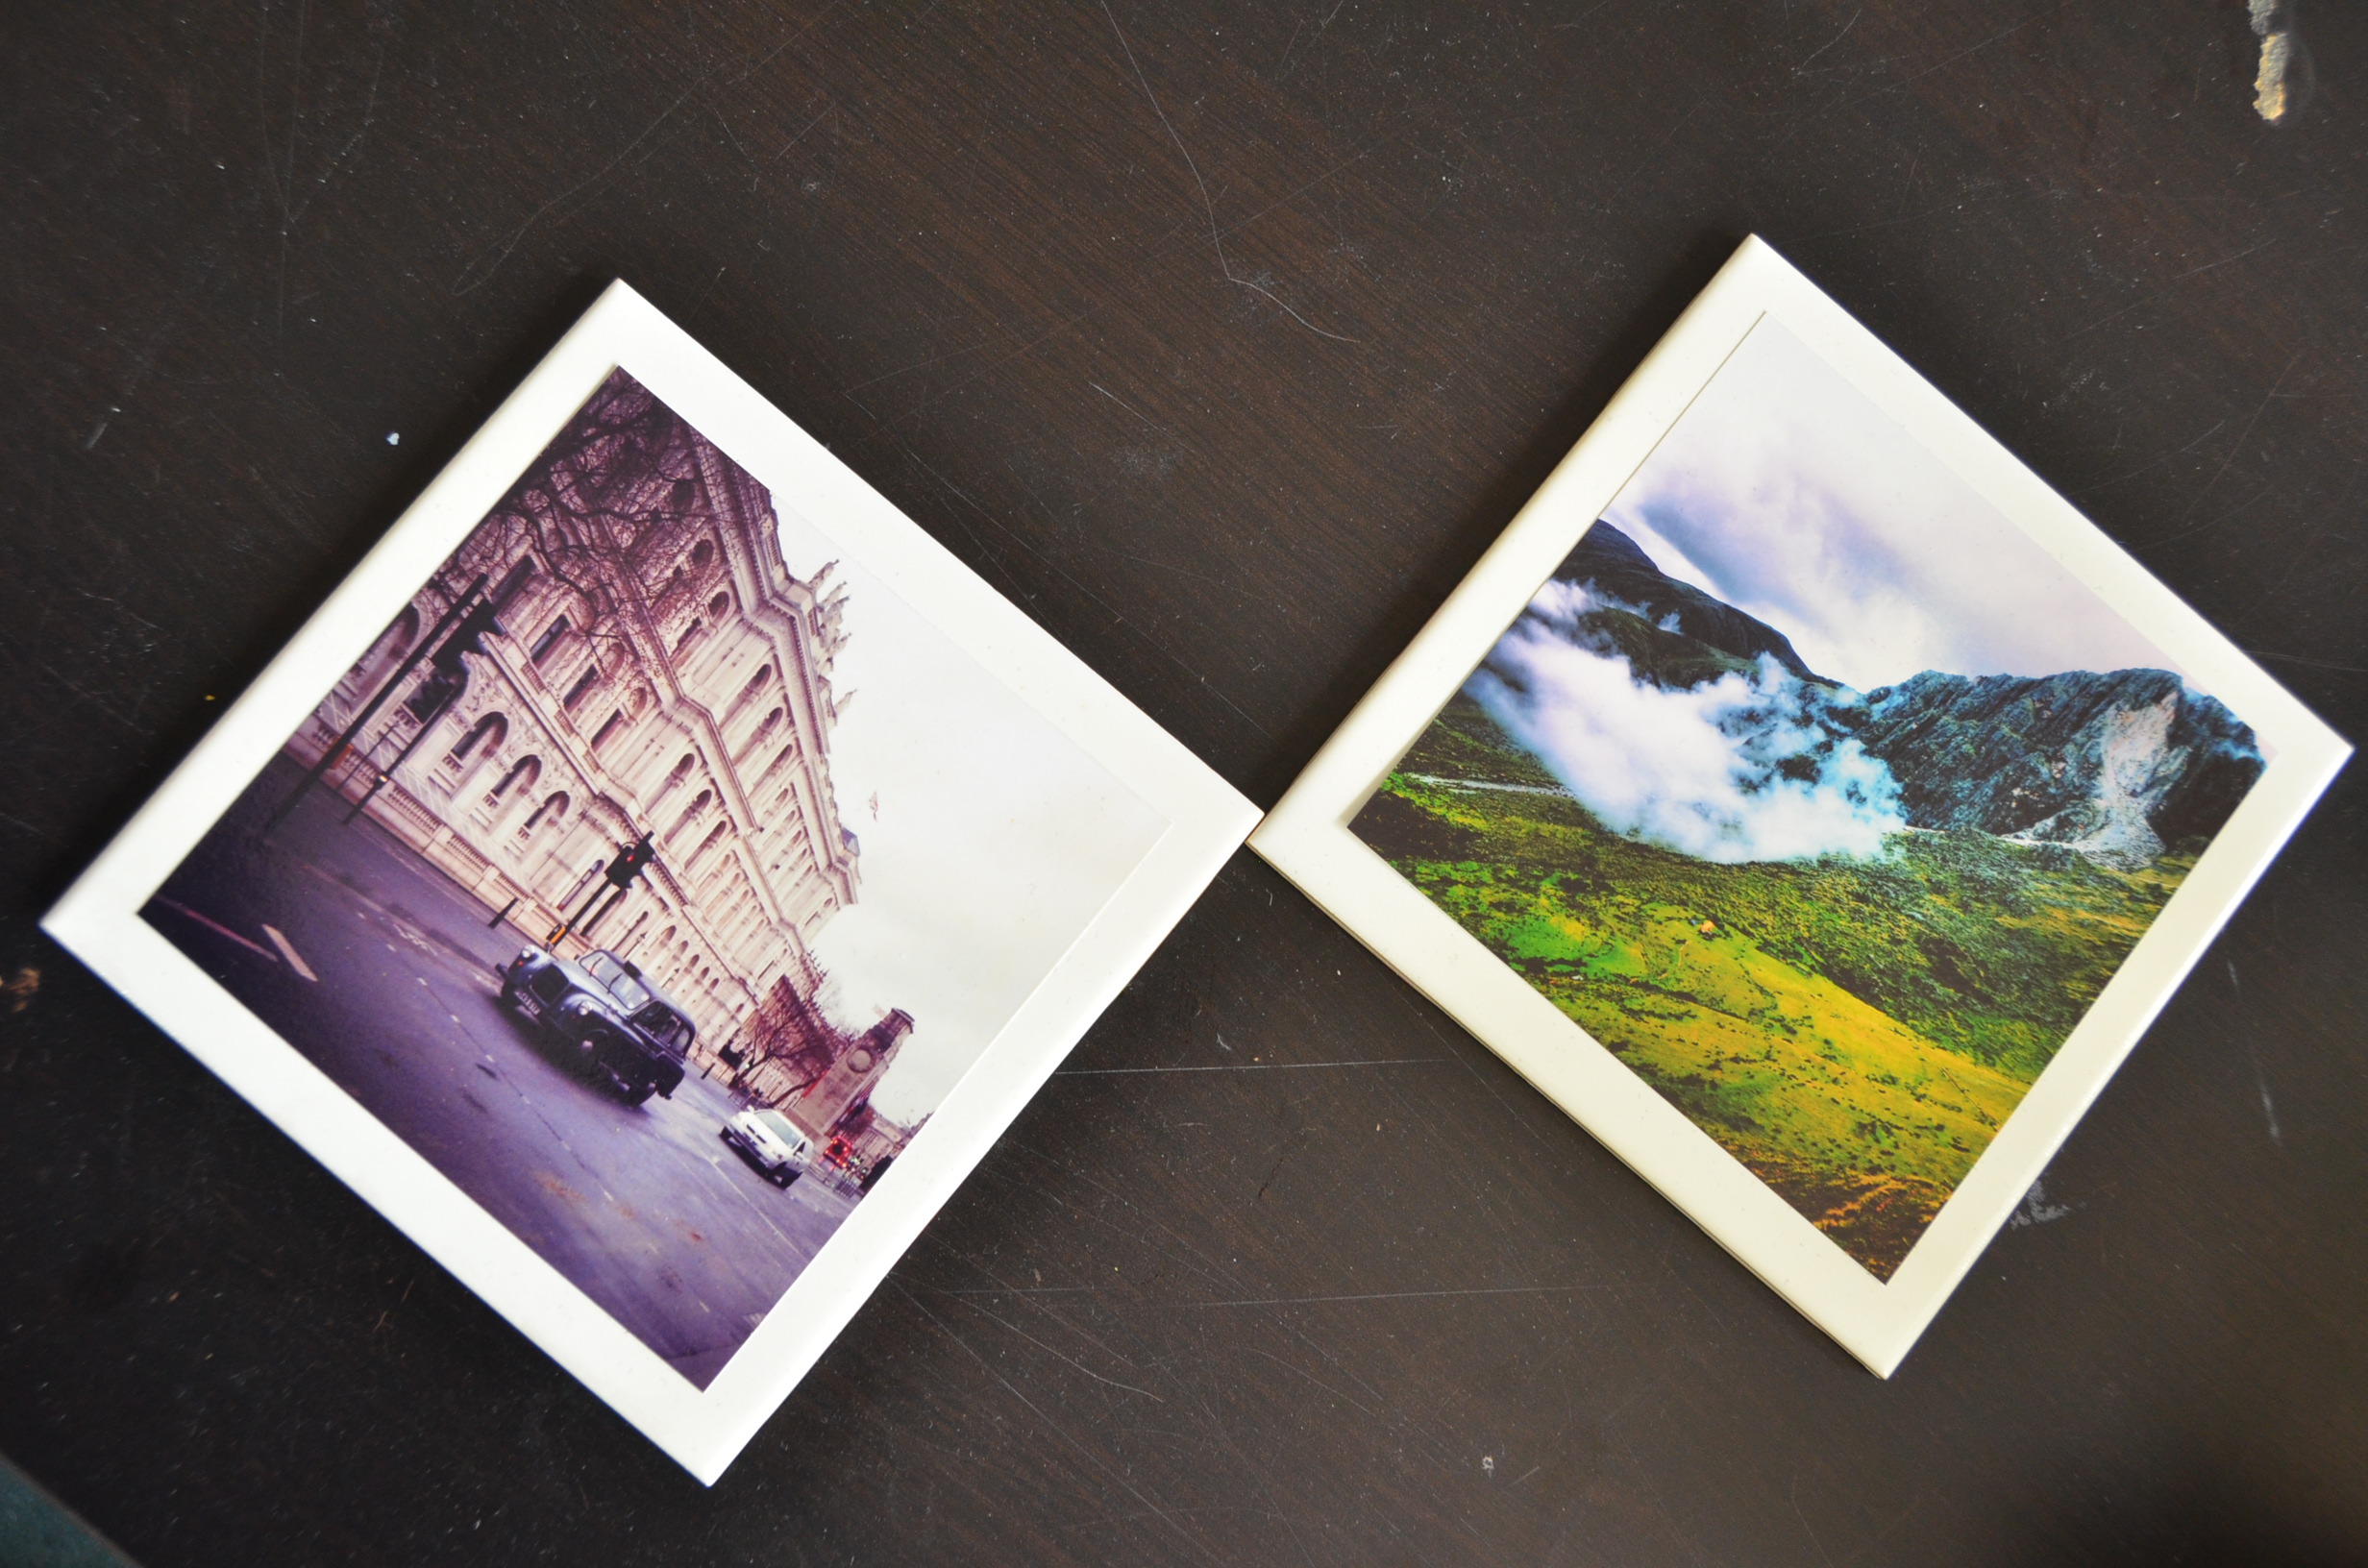
1) Select some inexpensive tiles from your local hardware store — or make use of any extra pieces left over from a renovation project. For best results, use 4×4-, 5×5- or 6×6-inch tiles.

2) Choose the photographs you want to use and get them printed to fit the tile size, or select a smaller print size to create a border. In this example I used 5×5-inch prints of old travel photos on 6×6-inch tiles.

3) Use a glue stick to apply a smooth layer of glue to the back of each photograph, making sure to get glue close to the edges. Remove any noticeable chunks of glue and press photos firmly onto tiles. Let dry.

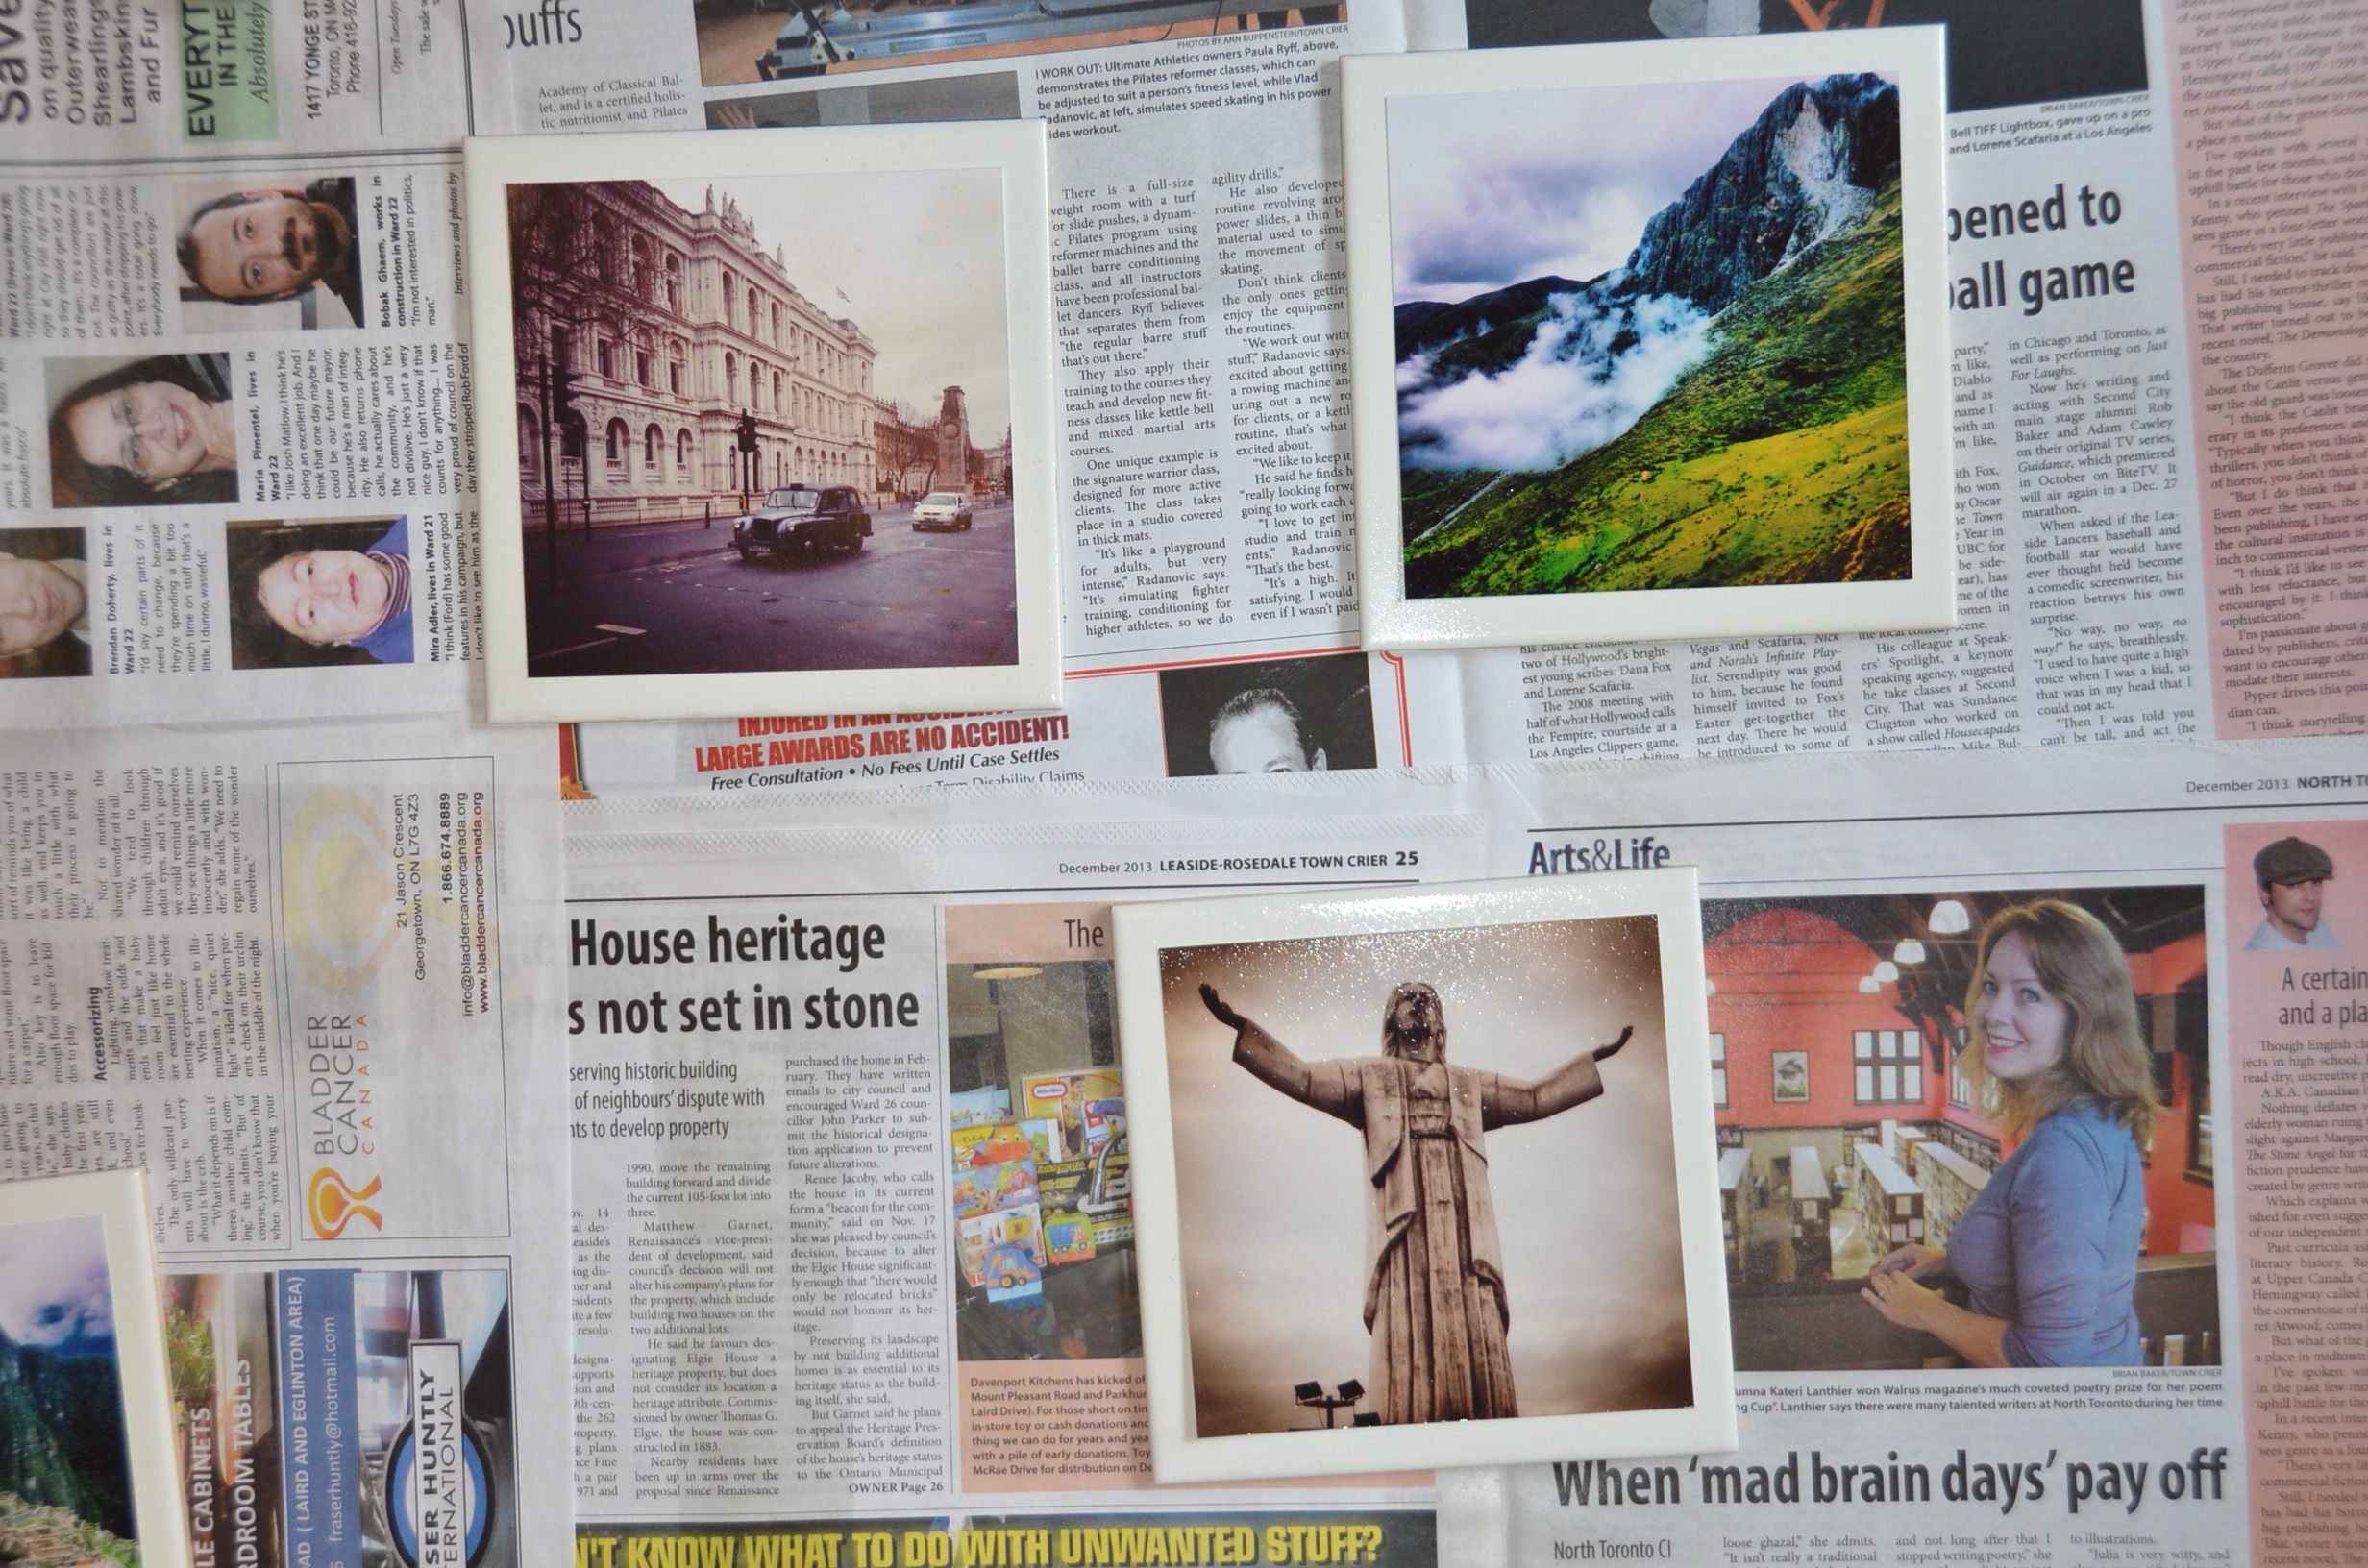
4) Lay out a few sheets of newspaper to protect the surface you’re working on. That old issue of the Town Crier will do (as long as it’s not a page with my article on it!). Spread the tiles on top with the photos facing upwards.

5) Apply a few light coats of high-gloss finishing spray. Allow enough time for the finish to dry between coats.

DSC_8002

As an alternative to the spray, use a paintbrush to apply coats of Mod Podge to the top of the tile and photo instead. The end result is similar but not quite as glossy.

This article was originally published in the Leaside-Rosedale, Forest Hill and North Toronto Town Crier.

LR14-coasters

DIY: Mugging up for morning Joe

DSC_9498

I’m not a morning person.

In fact, I can be a bit of a crabby pants (as my family can attest) until I have a dose of caffeine to help me wake up.

I was having my daily — okay, busted, twice daily — cup of coffee earlier this week when inspiration struck as I stared at the drab mug in my hand.

The time had come to flex my creative juices and add some cheer to my morning routine by jazzing up my collection of plain mugs.

While I hadn’t doodled since those boring school art classes of years ago, I started with a few simple but cute cartoon-like alien drawings, which I practice drew on a notepad first.

As I looked at the mugs I decided to add some lines, like “I’m Not Human at This Hour” and a motivational “You’ll Be Awesome Today” — even though an inspirational quote probably won’t get me feeling chipper bright and early on any morning.

DSC_9501

With Father’s Day around the corner, for my next mug I thought a personalized message to My #1 Dad would be a timely ode to pops. See photos at right for the end result. Did I intentionally leave out the “1” on the mug as a play on the “Have a Day” t-shirt slogan (the one with the expressionless emoticon)?

Did I mean to reference a hashtag, or did I simply forget to include it because it was too early in the morning?

I’ll let you decide.

For my piece de resistance I made note of some of the important dates in my life. For your own mugs you could incorporate any meaningful dates, such as the birth of your kids or your anniversary.

What you need:

• 4–12 plain mugs (I like the look of white mugs, but feel free to use colourful mugs)
• 1 oil-based paint Sharpie marker
• 1 can of acrylic sealing spray or high-gloss finishing spray

DSC_9426

1) Practise your designs first on a piece of paper, to perfect your drawings without wasting any mugs on trial and error.

2) Once you are happy with the look of your artwork and phrases, it’s time to take your masterpiece to the mug, using an oil-based paint or Sharpie marker.

3) Let the mugs dry for at least an hour.

4) Place the mugs in your oven and then heat the oven to 350 degrees.

5) After baking the mugs for 30–45 minutes, turn off the oven and let them cool down. Allowing the mugs to heat up and cool off with the oven will prevent the ceramic from cracking.

6) Repeat the heating and cooling-down process to help the markings set.

7) Remove the mugs from the oven and let them dry for an extra hour, or overnight, depending on your schedule. To avoid smearing, be careful not to touch your drawings in the process.

8) For a final layer of protection — to stand up to the dishwasher — finish off by applying a coat of acrylic sealing spray or high-gloss finishing spray and let dry for at least an hour.

You now have some custom cups for the Joe that starts your morning off right.

photo 1(9)

This article was originally published in the Leaside-Rosedale, Forest Hill and North Toronto Town Crier.

LR12-mugging

DIY: Quick art for your walls

DSC_0430

I moved earlier this year and still have a lot of bare walls throughout my new apartment.

Since I don’t have a huge home décor budget, I am a journalist after all, I decided to create my own pieces of art to make my home homier.

I decided to tackle a simple project to start.

This abstract art project is straight-forward and only takes a few minutes to complete, so you could even get your family involved in the process.

What you need:

• 1–3 pieces of canvas
• 2 rolls of green painting tape (one thin, one thicker). I substituted one roll of green tape for clear tape as a last minute fix.
• 1–3 tubes of acrylic paint (I chose silver and violet)
• 1–3 paintbrushes

DSC_0413

1) Apply several pieces of thick and thin tape onto a canvas in different directions to create a unique design. Press the tape firmly onto the canvas, so the paint won’t seep underneath. (If you look closely at my violet piece you can tell I learned this lesson the hard way.)

2) Lay out some newspaper to protect the surface you are working on.

DSC_0416

3) Apply a coat of paint to all the white areas of the canvas, including all the edges. It doesn’t matter if you accidentally paint on the tape.

4) Let dry for a minimum of 30 minutes. My paint was fast drying, so allow more time to dry depending on the type of paint you use.

5) Remove all the pieces of tape from the canvas to reveal the white portions and the final look of your masterpiece.

DSC_0421

6) The piece is now ready to be hung up, or the process can be repeated on other pieces of canvas for a series of paintings in the same or different colours. Just remember to use a fresh paintbrush if you’ve decided on a new paint colour for the next canvas.

You could also try this project with spray paint instead of acrylic paint.


Black and white art

For my next work of art, I attempted to replicate a piece of art I stumbled upon on Pinterest.

Inspiration for Black_White Painting

Although it looked simple enough — how hard could a black and white painting be? — I still thought it wise to attempt on a much smaller scale in case things went awry.

What you need:

• 1 canvas
• 1 tube black acrylic paint
• 1 tube silver acrylic paint
• 1 paintbrush
• 1 glass of water

1) Lay canvas onto newspaper to protect the surface you are working on.

2) Dip a paintbrush in water and then into black paint before applying long strokes of paint onto the canvas, starting about halfway from the top.

3) Apply several more coats of paint, focusing on the bottom of the canvas, getting lighter toward the middle of the piece.

4) Optional: To make my piece one-of-a-kind I decided to add some silver paint into the mix. After dipping the paintbrush in silver paint, lightly dab it onto the black areas of the painting and then top it off by dabbing black paint onto it so it blends in.

5) Let dry for a minimum of 30 minutes (longer if your paint isn’t fast drying).

6) Display the painting for guests to admire.

Here’s my version:

DSC_0425

This article was originally published in the Leaside-Rosedale, Forest Hill and North Toronto Town Crier.

LR013-quickart

DIY: How to make edible Easter nests

IMG_7342

One of my favourite things about holidays – aside from spending quality time with friends and family – is getting to enjoy delicious treats. My biggest weakness? Chocolate.

Here’s a sweet recipe using a very seasonal ingredient: Cadbury Mini Eggs.

These edible Easter nests are quick to make and will likely disappear just as fast.

What you need:

3 cups of Golden Grahams cereal
2 cups of pure Belgian white chocolate wafers (available at Bulk Barn)
1 large bag of Cadbury Mini Eggs
1 cup of chopped pecans (optional)
1 package of cupcake baking liners

Instructions:

1) Melt pure Belgian white chocolate wafers over low heat in a medium-size pot, stirring constantly.
2) Once melted, remove pot from element and add cereal and pecans. Mix together to make sure the chocolate coats the Golden Grahams and nuts.
3) Spoon mixture into individually laid out cupcake baking liners. Try to keep the edges higher than the centre.
4) Let stand for a few minutes before topping centre with Cadbury Mini Eggs or get your youngsters involved by letting them add the candy-coated chocolate eggs to the nests.
5) Once hardened, the nests are ready to serve as individual treats.

IMG_7345

Happy Easter!

This article was originally published in the April 16, 2014 edition of the Leaside-Rosedale, Forest Hill and North Toronto Town Crier.

LR17-easter nests

DIY: Make your name a standout

DSC_7679

From various DIY art for your bedroom to fun baking ideas for the whole family, in this column I will showcase monthly projects and ideas you can try at home.

This first project is a quick and easy one to get you started on the road to DIY art.

What you need:

• Canvas
• Wooden letters
• Glue
• White spray paint

Directions:

1) After selecting the name, word, phrase or lyric of your choice, lay the individual letters onto the canvas to ensure they are spaced out nicely and are visually pleasing. Since my friend just had a baby, for my project I chose to spell out the name of her son, Jackson.

For sayings such as “Carpe Diem,” “Home Sweet Home,” or “Live, Laugh, Love,” consider dividing the words among multiple canvases. Canvas, glue, wooden letters and spray paint can be found at local craft or dollar stores.

2) Once you are pleased with your layout, and have ensured the word(s) fit on the canvas, apply glue to the back of each letter and press firmly onto the canvas. Remove any excess glue immediately and let the canvas lay flat to dry.

3) Once the glue has set, lay canvas onto scrap newspaper or cardboard and evenly apply several light coats of spray paint across the canvas and wooden letters. Let dry for a minimum of 30 minutes. Apply another coat of spray paint to the letters if needed once the paint sets.

DSC_7668

4) Your artwork is now ready to be placed on a wall or mantle. The neutral shade of this project makes it perfect for gift giving since it can be paired with any paint colour. I gave mine to my friend at her baby shower last month. She loved it!

This article was originally published in the April 2014 edition of the Leaside-Rosedale, Forest Hill and North Toronto Town Crier.

FH11-jackson

Local Designer: Trout Rainwear

Trout

Ashley McDonald and Jennifer Lancefield were on a beach in Florida when the idea for their company — Trout Rainwear — struck.

During yet another brainstorming session, which had been ongoing for years since they first decided to start a fashion line, the sisters realized they’d finally found their niche.

After coming up with the topic of rainwear, they realized existing styles were too sporty or were high-end trench coats, with nothing between.

“That’s were Trout found its core inspiration,” McDonald said in a recent interview. “It dawned on us that there aren’t any stylish, fashionable, functional rain jackets out there.

“We noticed a gap in the market and jumped on it.”

The name came from inspiration closer to home.

They chose Trout Rainwear, she said, because they wanted something Canadian that’s associated with water and is easy for people to visualize.

Debuting last spring at Holt Renfrew stores, Trout is a women’s rainwear brand featuring waterproof, breathable and stylish rain jackets in colours that range from classic neutrals to neon.

Baby Gila 5Cape 1

The jackets are made from an Italian double-faced cotton blend, and are sealed and bonded on the interior with seam tape, which creates a waterproof seal.

“We have a variety of carefully developed designs that bridge the gap between fashion and function,” McDonald said. “These jackets transition effortlessly from daytime to evening.”

Although the most popular item is the sporty Humboldt coat, McDonald’s personal favourite is the Sevan cape, a two-toned piece from the Spring Summer 2014 collection. Some pieces are also reversible.

“It’s fun to wear and different,” she said. “I love having the option of tucking your arms in or out.”

The outerwear company currently spans three cities: Toronto, New York and Vancouver. Based in Summerhill is McDonald, who has a background in retail and worked on the buying teams for Selfridges in the UK and Holt Renfrew in Canada. She runs the company’s day-to-day operations and oversees the business happenings.

With a background in finance and years of experience in the music industry, the team’s marketing guru is New York City-based Lancefield.

Their West Coast connection is designer Sarah Hopgood, a Parsons private art and design college graduate with experience designing for brands including Theory in New York City, Ports 1961 in Hong Kong and Hudson’s Bay in Canada.

“We’re a strong team, as we all bring something unique to the table,” McDonald said. “We maintain a good working relationship through email, phone and visits.

“It miraculously works.”

McDonald says she never tires of watching people try on items from their collection and receiving sample boxes from their manufacturer.

“It’s like Christmas every time we open those boxes,” she said. “Seeing all our selections and work off paper in an actual sample that you can try on is so rewarding.”

She stresses they’re also proud of the fact that the jackets are made in Canada, and plan on playing with new colours and introducing a new style each season.

As for the future, the hope is to expand to as many countries — and spot as many Trout’s on the street — as possible.

“I hope people feel good and smile every time they put on their jacket,” McDonald said. “There’s no better feeling than being dressed appropriately for weather, and then to feel stylish wearing it when it’s not the greatest weather is icing on the cake.”

In Business: Douce France

DSC_5133

Coming from a large family in France, Christel Saba — the 10th of 14 children — got into business at age 14 selling baked goods, pastries and confectionary.

By 16 she’d already won an award for unique and personalized gift presentation and then set her sights on learning more about the industry.

“The following years I started to work for my brothers — seven of them are bakers and pastry chefs in Paris,” Saba says from Douce France, her shop on Yonge Street south of Castlefield Avenue. “Then I wanted to get a global view of that job so I went to work in different places and my last position was at a castle (where) we would prepare menus for up to 500 people and I was responsible for the final touches.”

Named after her father’s favourite song, Douce France offers artisan products from her home country. There is tea from Compagnie Coloniale, the oldest tea house in France, pralines from Confiseur de Luxe Mazet, which are made using a recipe that dates back to 1636, coffee and chocolates from Voisin, a company established in 1897 and Angelina’s hot chocolate, a company dating back to 1903.

People in Paris line up, sometimes as long as an hour, for the hot chocolate, she says.

Different regions are on display in her store, each of them with different specialties imported from France.

“I don’t work with the importers but with the artisans themselves and this is how we can ensure quality and authenticity of the products any time of the year,” she says. “We offer plates on which we put the different specialties so that people can discover them before buying a whole bag.”

Saba also offers soups, catering, centrepieces for special occasions and customized gift boxes and baskets, which are also imported from France and can be filled with goods like biscuits, cakes, jam, glazed chestnuts and chocolates.

The Parisian café-boutique, set up six months ago, is not only the culmination of her experience in the food industry but also years spent working as a language teacher.

“It is for me a cultural and commercial project,” says Saba, who moved to Toronto four years ago with her Iranian husband and their three children. “We focus on the quality of the products and the service, the relationship we have with our customers, and that’s why the staff also wear the Parisian uniforms and they are bilingual.

“We’re trying to create a Parisian atmosphere in the café, we have French music and it sounds like customers love that.”

Several school classes have already visited the café to learn about French traditions, the different regions of France and the products that come from the areas while being immersed in a French environment.

“They had a multiple choice questions game and then they had the hot chocolate and I also prepared some follow-up activities to motivate them to learn French in a different way,” she says. Although the experience reminds some customers of a trip to Paris, others find they are brought back to memories of growing up in France.

“We’ve had some customers in tears because even the décor is from France,” she says. “People when they come over here, it reminds them of their childhood.

“They are so happy and it’s a taste of France for them in Toronto.”

The scoop: Favourite holiday traditions

It’s almost the most wonderful time of the year. To spread the holiday spirit before Santa Claus comes to town, we asked some personalities from our community to share their favourite traditions and memories.

fisher “Christmas Eve is by far the biggest holiday tradition we have in the Fisher household. My parents have always invited friends who don’t have family in Toronto to come and celebrate with us. No one should be alone on Christmas. I’ve grown up celebrating one of the best holidays with these people, singing Christmas carols; they are my extended family. Three of our guests are over 90! I know that my three siblings and I will continue this tradition of opening our hearts and homes to those who are less fortunate than us.” — Sarah Fisher, actress, Degrassi: The Next Generation.
nealb “For years my wife and I hired a farmer from north of Toronto to bring a team of Belgian horses and a hay wagon into the city. Along with our three daughters we would invite neighbours to hop on and sing carols as we drove around Leaside. Afterwards we would warm up in our house with drinks and food (and, of course, Neal Brothers snacks) for a casual party. We did it for over six years — special memories!” — Peter Neal, co-founder, Neal Brothers.
elle “A tradition in my household since my daughter, Sophia, was old enough to walk and talk has been to have all her close friends gather in our home, blast the Christmas carols and have a healthy gingerbread decorating competition. The kids love the challenge and so does competitive mommy! All the cousins gather and judge the houses and then the winners get to put the star on our tree.” — Elle Daftarian, owner, Petite & Sweet and host of The Food Network’s SugarStars.
tingas “I love the holidays. I actually love gift giving so much so I like to make my own bows. Every year I break out the hot-glue gun and bring out my inner Martha Stewart, to create pretty and unique packaging.” – Angie Tingas, co-founder, Niki and Lola.
tromba “I have a tradition to do a bar hop in early December. It seems like most of the cocktail bars in Toronto have winter and Christmas cocktail features. They warm you up inside. For example, La Carnita is featuring a mulled wine cocktail (with tequila of course). It’s all about winter and holiday flavours. The level of happiness and cheer amongst the bartender and server communities is up a notch.” — Eric Brass, founder and co-CEO, Tequila Tromba.
scrim “When I was nine years old my best friend was named Lisa. She lived in a big old house down the street and loved Christmas trees so much that she smuggled a tiny pine bough into her room. I helped her decorate. Her mom came in and asked what it was. Lisa stammered, ‘It’s a Hanukkah bush! Please can I keep it?’ Her mom left the room, but not before I saw her smile.” — Richard Scrimger, author, The Nose From Jupiter, Ink Me and Viminy Crowe’s Comic Book.

DIY: Countdown to Christmas

DSC_4999

Count down to Dec. 25 with a homemade 12 days of Christmas calendar. Forget the partridge in a pear tree — this DIY craft idea is filled with fun activities to spend quality time together as a family leading up to the main event.

What you need:

1 medium-to-large corkboard
12 small gift bags or envelopes
1 package of thumbtacks
12 gift tags
Wrapping paper
Ribbon or garland
Numbered stickers (1 to 12) or stencils and ink to create your own numbers
An assortment of 12 chocolates or candies
Tape

Instructions

1) Set aside 12 small gift bags or envelopes (or a combination of both). Alternatively, brown paperbags, baby socks, boxes or burlap sacks can also be used.
2) Select 12 (or make up your own) of the following activities to complete as a family:

Decorate the tree
Take a Christmas card photo (ugly sweaters are encouraged)
Go skating
Watch a holiday movie
Have hot chocolate
Write a letter to Santa
Tour the best decorated houses in the area
Go see a Christmas play
Bake cookies (or reindeer cupcakes) for Santa
Make and decorate a gingerbread house
Read a Christmas story
Play board games
Get a picture taken with Santa
Open a gift on Christmas Eve
Wear new pajamas to bed
Open presents!

3) Write your chosen 12 selected activities on the back of 12 gift tags.
4) Fill small gift bags or envelopes with chocolate or candy.
5) Place each of the 12 gift tags with activities inside every envelope or attach one to each bag.
DSC_4951IMG_1775 6) Cover a corkboard in wrapping paper of your choice.
7) Attach two strips of ribbon or garland on to the corkboard. One should be near the top and the other near the centre. Tape excess pieces on the back of the corkboard.
8) Lay out the small gift bags or envelopes on the corkboard to make sure it looks pleasing before attaching each piece with a thumbtack along the ribbon or garland line.
9) Using the numbered stickers, stick the numbers 1 through 12 on each bag, envelope or gift tag. They can be placed in order counting up or down to 12 or out of order so it takes people in your household a few seconds to find the next number.
10) Place the corkboard on display and you’re ready to start counting down the days to Christmas.
DSC_4997

Fashion: Dressed for the season

Style expert Afiya Francisco can regularly be found sharing her fashion expertise on Global News’ The Morning Show, CBC’s Steven and Chris and on Entertainment Tonight Canada.
afiya_francisco_600x340-594x335
With Christmas fast approaching, Francisco revealed her list of holiday must-haves to get through this busy time of year looking sharp and in season. Whether it’s an office party or a family celebration, the blogger behind The Style House and editor-at-large of Real Style magazine has got you covered.

1) A statement clutch. “Something shiny, bright and/or sparkly can add just the right amount of festivity to an otherwise simple outfit,” Francisco says.
Tommy clutch
2) A great coat. “Outerwear is often forgotten but it’s the first impression and should be chosen with more consideration than an afterthought,” Francisco says. “If it’s a second coat, chosen as an occasion piece, I suggest a versatile but surprising hue like red or cobalt.”
Paola Coatlula coat club mon

3) A tux jacket. “This piece is a cool and sexy alternative to the little black dress. Thrown over a dress or worn with trousers, a tux is an easy solution to holiday dressing.”
tux-jacket zaratux-jacket

4) Sequins. “A blouse, a dress or pants, a chic sequined piece is an instant dose of holiday cheer.”
joe fresh sequin 2joe fresh sequin

Extra holiday essentials:

SEEING RED: Nothing shows off holiday spirit in a stylish way quite like sporting the colour of the season.
Banana-Republic-Fall-Winter-2013-2014-Collection-For-Women-7

GO FOR BOLD: A statement necklace adds a layer of interest to an outfit and takes a dress or shirt up a festive notch. Photo courtesy Sistaco.
By The Light